Custom Deploying the Aretas Sensor Edge Software
Quick Launch Steps
If you are developing or beta-testing the Aretas Sensor Edge Software releases, you will likely have been provided with a .zip or tar.gz file containing the main application .jar file, required libraries, config files and html/js application.
If you are self-deploying, there are two major required system dependencies; a redis server and a JDK or JRE. The Redis server can be local on the same device or installed remotely (network accessible). Aretas edge devices and systems prefer Ubuntu (14 and 16 LTS versions currently). Armbian and Debian are also generally acceptable although Debian is not a thoroughly tested target.
Redis
To install Redis server on Ubuntu:
sudo apt-get install redis-server
Java
Aretas builds, deploys and tests using the Oracle JDKs and JRE. The current supported JDK/JRE is Java 8. Java 10 (the most recent Java version is not working correctly right now; partly because of the stripped out modules and our build file doesn’t yet support these changes). Therefore we recommend installing the Java 8 Oracle JDK or JRE. We typically use the webupd8team ppa for installing Java
sudo add-apt-repository ppa:webupd8team/java
sudo apt-get update
sudo apt-get install oracle-java8-installer
Next, follow the rest of these steps to prior to launching the .jar file:
-
- Create a folder called /opt/aretas and a log folder /var/log/aretas
- Copy the .zip or .tar.gz file to /opt/aretas and unzip or untar the provided file into /opt/aretas
- If you are using XBee / Bluetooth or ZigBee Sensors / Devices, ensure your USB to Serial adapter is plugged in OR if you’re using a supported embedded device (such as Orange Pi / BeagleBone / etc) ensure your wireless adapter board is installed and your module is configured correctly.
- Edit the file /opt/aretas/BRIDGE.properties. Since these are just quick notes to get the Edge software running, we don’t detail all of the config variables, just the absolutely minimum config variables to get the system running. The minimal config options will typically be:
- Configure the serial port:
bridge.serialport=COM5
bridge.serial.baudrate=19200
In Ubuntu, an Aretas USB to Serial device will typically appear as /dev/ttyUSB0 unless you have other devices. You can diagnose which port your USB to Serial device is on by simply unplugging it and plugging it back in again and checking the output from ‘dmesg’
- Redis configuration
bridge.redis.hostname=192.168.1.19
bridge.redis.password=foobaz
If you have installed redis locally, just use localhost for the hostname.
- Web application folder
bridge.web.enablegui=true
bridge.web.htmlfolder=/opt/aretas/IoTGatewayWebUI
Even if you’re only using the REST API, it’s a good idea to enable the web gui for diagnostic purposes.
- Configure the serial port:
- If this is a first run of the software, you will need to initialize the database. The application jar has several maintenance features and diagnostic commands. To initialize the database, use the following command line arguments:
java -jar AretasBridge2018.jar --function initializedb
If you need to reset the database without destroying the file, run the following command:
java -jar AretasBridge2018.jar --function purgealltables
- That’s it! You can now run the daemon:
java -jar AretasBridge2018.jar
You can now navigate to the Sensor Edge UI: http://<device_ip>/ and the Sensor Edge dashboard will appear:
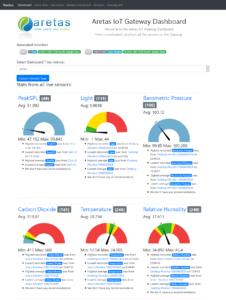
Aretas Sensor Edge Dashboard
To learn more about the Aretas Sensor Edge REST API, UI and configuration properties, consult the API documentation.
0 Comments