Configuring WiFi on your Aretas Sensor
If your sensor comes configured with WiFi option, follow the steps below to bring your sensor online and connected to Cloud. ![]()
Before Configuring your Sensor WiFI
Ensure that your device is added to your Cloud account OR to your Edge device (especially if you have chosen to filter sensor MAC addresses on your Edge Device).
Typically, Aretas will add your sensor to your account before you receive your device. However, if you need to add the device yourself, login to the Cloud portal at the following URL:
http://iot.aretas.ca/html/dashboard.html
Adding a Device to Your Cloud Account
If you have not added a device to your account before, you can view instructions here:
“Adding Locations and Sensors to your Account”
Once you have added the Sensor to your account, continue on and configure your device WiFi.
Configuring your Sensor WiFi
- Connect the power to your Sensor and ensure the Sensor is powered up (look for a red power LED glow inside the case, if you have chosen a low light emission version, you will likely be unable to see the power LED). If you have several sensors to configure, only plugin ONE sensor for now.
- Use your mobile phone to scan for the AP provided by the Sensor’s WiFi module. If you have a modern Android device, drag down from the top of your screen to show the notifications panel.
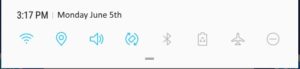
- Long-press the WiFi icon to bring up the WiFi configuration settings:

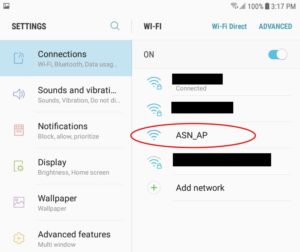
- In the WiFi configuration settings, you will see the Sensor AP in the list of connections, click to connect to it. If the ASN_AP connection doesn’t show up, double check your power connection.
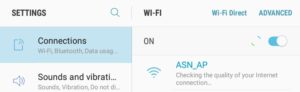
- You may get a message after your device successfully connects saying “Internet may not be available” – this is fine and will disappear when you reconnect to your regular WiFi connection later.
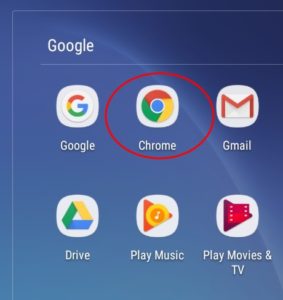
- Open a browser on your device (such as Google Chrome)
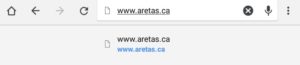
- Type in the address of a web site (such as www.aretas.ca) and hit go, you will be redirected to the Sensor WiFi portal.
- Once redirected, you will see the following configuration page
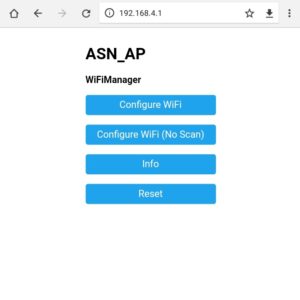
- Click on “Configure WiFi”, you will be directed to a page that shows all of the available WiFi routers within range. Click on the WiFi router to which you would like to connect your Sensor. The SSID text box will be automatically populated with the WiFI SSID.

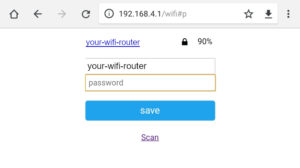
- Once you have chosen an SSID and clicked on it, type in the password for the WiFi router and click “Save” the Sensor will now attempt to connect to your WiFi router. If it does not connect the first time, double check your password and try again.
- Once the Sensor has connected to your WiFI router, the ASN_AP connection will no longer appear in your WiFi connections list (unless you have other Aretas Sensors you’re configuring). If ASN_AP still appears in your connections list, it means the Sensor was not able to successfully connect to your WiFI. In this case, repeat steps 1-10 and try and connect again. Double check your WiFi router password and connections settings.
- If your Sensor is connected, congratulations! Repeat steps 1-11 for any other WiFi sensors you have. Once all of your Sensors are connected, login to your Cloud account or Edge Device to view your sensor data. It may take 5-10 minutes for Sensor data to propagate to your cloud account. Important Note: Make sure you “Forget” the ASN_AP network on your mobile device to prevent reconnecting to the device in error after setting it up.
What to do if you change your WiFI Router Settings
If you change your WiFi router or password, the Sensors will be automatically disconnected from the network and will return to AP mode. In this case, you can repeat the steps in “Configuring your Sensor WiFi” in this document.
Forcibly Resetting Your Sensor
Your sensor is designed to be continuously connected to the same WiFi router and to reset itself if the WiFi router settings change. However, if you need to forcibly reset your WiFi settings, you will need to follow the “Resetting WiFi” steps in the Firmware Guide for your Sensor.
0 Comments